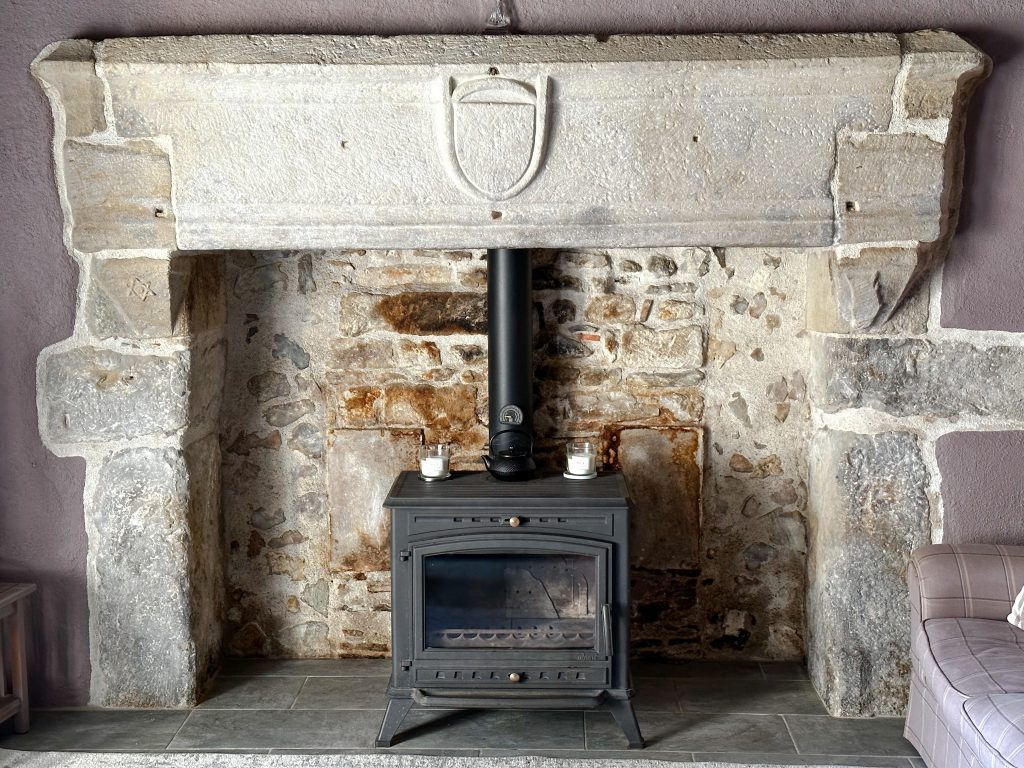
Old French homes are known for their unique character, with thick stone walls, exposed beams, and charming shutters. These ancient abodes often feature large stone fireplaces with spacious chimneys, as heating options were limited during their construction. While many fireplaces have been modified or converted over time, some still retain their original form.
For new homeowners, especially those purchasing their first French property, operating an open fire can be a novel experience. If you fall into this category or simply wish to learn more about open fires in France, stick around as we dive into an introduction to open fires in France.
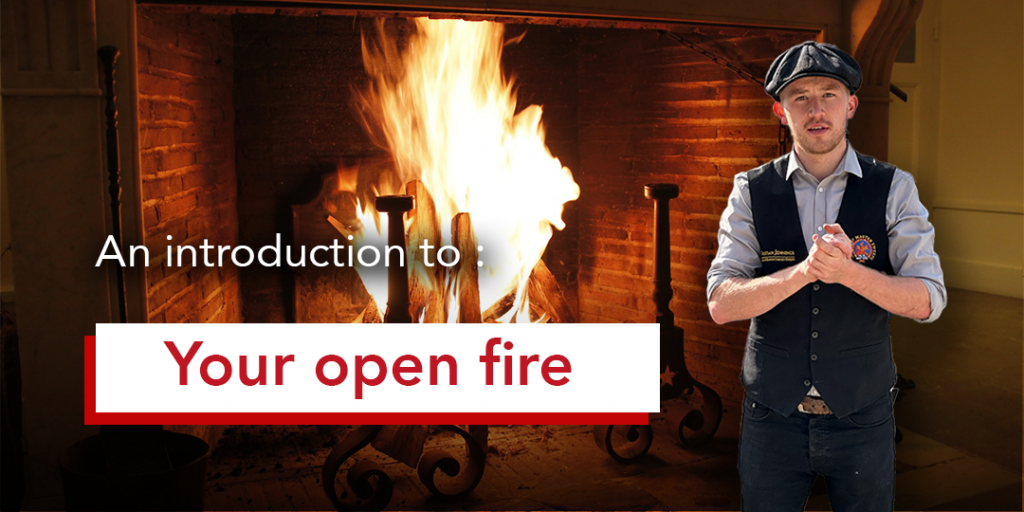
The French open fire
Certainly! Here’s a revised version with fewer adjectives:
Old French homes are known for their unique character, with thick stone walls, exposed beams, and charming shutters. These ancient abodes often feature large stone fireplaces with spacious chimneys, as heating options were limited during their construction. While many fireplaces have been modified or converted over time, some still retain their original form.
For new homeowners, especially those purchasing their first French property, operating an open fire can be a novel experience. If you fall into this category or simply wish to learn more about open fires in France, stay with me as we explore the basics.
The French open fire
One notable difference of French open fires is their size. In contrast to the smaller Victorian fireplaces commonly found in the UK, French fireplaces can be impressively wide. I’ve personally come across a converted 12th-century fireplace (Now converted for a woodburner) that spans just shy of a whopping 3 meters!
Not only are open fires in France much larger than those found elsewhere in the world, but their design is much more rudimentary. The Victorian fireplace aforementioned will be encapsulated with firebricks and a cast iron canopy to aid the creation of a heated environment for more efficient combustion. The French fireplace however is likely made of stone and lime plaster or maybe brick if you have a more ‘modern’ fireplace. These fireplaces are often over a meter wide and add very little benefit to the heated environment needed for efficient combustion apart from an equally large and inefficient stone surround and canopy, which unfortunately is perfect for stealing the very very heat we are trying to create.
In the past
Large open fires date back centuries in France. In the past, the large hearths were used primarily for cooking. It is therefore no surprise that buildings that were accustomed to hosting guests tended to have the largest hearths and chimneys to match.
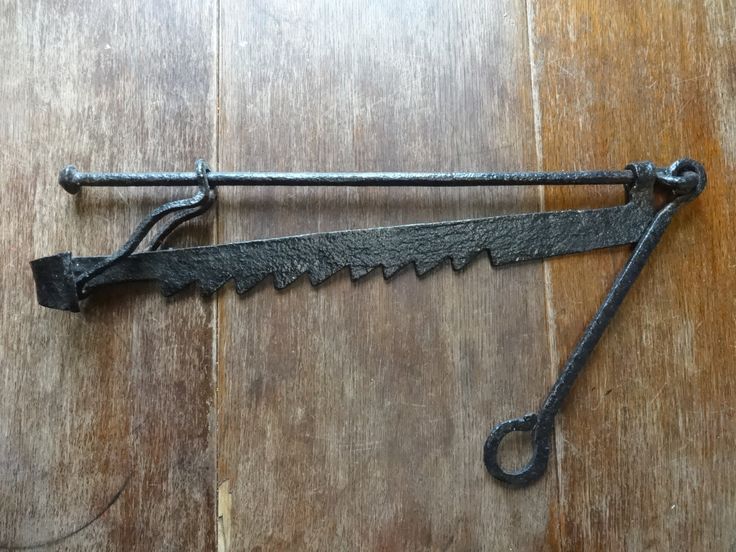
More modest homes were equipped with more modest fireplaces appropriate for the amounts of pots a family would need to feed themselves. Most were equipped with a fireplace pothanger (pictured below) which could be adjusted in height to bring the pot closer to or further from the flames of the fire as needed for cooking. If you, yourself have a stone fireplace, you may find one still in place.
As time passed, we discovered that large fireplaces and by association, large chimneys didn’t work all that well. As more uniform building materials became available, fireplaces (and their chimneys) were made smaller and smaller. Firstly, with brick and now modern day, with prefabricated blocks, as small as just 23cm in diameter.
Why have an open fire
Even the least efficient stoves on the market can provide up to 6 times more efficiency and therefore give out much more heat to your home all whilst using a considerable amount less fuel.
So why have an open fire? Well, the choice to have an open fire is often a decision not made with your head, but with your heart. Although modern stoves give you a window to look through in which to see the flames licking off the wood, nothing will beat the sounds, smells and look of an open fire crackling away, emitting it’s warm winters glow.
Where to start
You can of course start by lighting your fire straight on the hearth and using a spare log to poke the fire and keep in in check though what we would recommend you do is get yourselves the following:
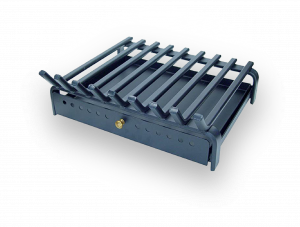
First, a fire grate. The aim of the game with fire is to create an environment where the gases in the wood, known as volatile hydrocarbons, or more commonly wood smoke are mixed with oxygen under heat to create combustion. Open fires are notoriously inefficient, so any advantage you can give your fire goes a long way. We therefore recommend you pick yourself up either a fire grate or some chimney dogs to elevate your wood and allow oxygen to saturate the largest possible surface area of the wood. If you are already elevating your wood, we recommend you buy a grate with an ash pan underneath, such as this one to save time (and mess) when cleaning up.
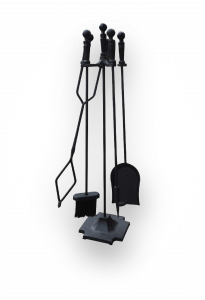
Next, some tools. As the hearth for your open fire will be oversized for the size of the fire you are having, you will need to control the fire by relocating wood that hasn’t yet burned to the middle and hottest point of the fire. You will also need to stoke the fire and keep the embers and wood charcoals free of ash for the wood above to encounter the most heat. Occasionally, logs or part of a log may fall from the ash pan and will need to be picked up and placed back on the fire. For this, a large pair of tongs will be appreciated to stop you burning your fingers or charring a fire glove. Most sets also come with a brush and dustpan, perfect for keeping your fireplace clean. One set of fire tools is rarely better over another so find one that you like the look of and has the above set of tools included. If you don’t fancy searching, we picked out this one for you here.
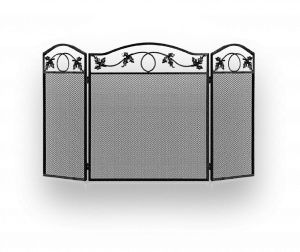
Finally, a fire guard. As wood houses knots, twists and turns, it is impossible that every fire you make will have a perfectly formed, perfectly symmetrical fire. Without having a firebox to contain the fire, like on a woodburner, you will, at some point, experience a stray piece of wood falling from your fire and rolling in whichever direction it pleases. Having a fireguard in place will stop the log reaching anything flammable such as rugs and carpets and also provides protection from the fire for children and pets (And anyone clumsy for that matter). Same as with the fire tools, there is little difference between the fireguard you choose other than aesthetically. We recommend you acquire one that can wrap around the fire such as this one here.
Lighting a fire
Before we can set the fire, we need to understand what it is that we are trying to achieve when using our fireplace. To most efficiently use your open fire we actually must turn our attention to the chimney. For a chimney to draw effectively, it must be hot. Now there is a natural negative pressure in the chimney/flue which will ‘suck’ wood smoke up into the flue even when cold but this effect becomes much stronger the hotter the flue is. Therefore we must aim to achieve sufficient heat in the chimney as fast as possible.
So what does this mean for our fire? Well, the main thing to understand is that if you are having a fire, have a fire. Do not light a small, piddly little fire and expect that you will have sufficient heat entering the chimney. Old French stone chimney are so much larger than their metal liner cousins meaning they require a much larger mass of exhaust gases even to function. Without sufficient heat in the chimney, the chimney will not draw very well and could lead to smoke escaping into the room, something we are desperately trying to avoid as smoke is of course, not something we want to be breathing in. The second reason for needing heat in the chimney is to encourage the wasted smoke to exit the flue at the top rather than condensing on the walls of the chimney as creosote/tar.
Getting heat into the flue as fast as possible means it is important not to be stingy on your kindling. Assess how many logs you will be burning at one time on your fire – even with the smallest brick open fires on my round, I would be looking at a minimum of two good logs – and set according to the instructions below.
The Scandinavian method
The Scandinavians are notoriously accomplished at all things wood burning. Taking a leaf out of their book, we now recommend all fires are started with the method they use in the North of Europe. Wood burns from the top down thanks to how gaseous it is. Therefore, the way we have been lighting fires since our ‘ooga-booga’ cave man days has actually been rather inefficient.
The traditional ‘wig-wam’ method of placing kindling on-top of a firelighter of some kind and then placing our logs on top causes the densest woods to be ignited before we have encapsulated enough heat for the smoke being released to burn. When inverting our starter fire with the dense logs on the bottom and flammable firelighters on-top, we allow the components that have the largest surface area and are the easiest to burn to catch and give off heat, setting alite the layer below meaning that the thick dense woods don’t start to give off their smoke (Where most of the heat is stored) until the gasses are ready to burn.
To set your fire, first place the logs you want to burn onto your fire grate. Using two or more logs of the same height will be a benefit in keeping the foundation of your fire level for building your kindling on top. Next, start placing your kindling in a lattice formation (Think Jenga without the middle pieces) covering the entire length of the wood. Build your lattice a good few layers high – As we spoke about before, don’t be stingy on your kindling! Once your lattice is set, begin placing your firelighters in and on top of your lattice formation. We recommend these wax nests for starting your fire – they are highly flammable and give off plenty more heat than their paraffin counterparts.
Once you are set, light each one of your wax nests and watch your fire come to life!
Controlling your fire
An open fire does not give you much control if any at all. Whereas with a woodburner, you can adjust the air intakes to supply more or less oxygen to the fire as needed, with an open fire, you can only adjust the fuel itself. With an open fire, you do not have the benefit of burning your fire in a heated environment like the stove’s firebox so it is therefore important to keep the fire concentrated to maximise the energy around the fire, used for the reaction between the wood gases and surrounding oxygen.
We have already spoken about making sure your fire is decently sized and producing as sufficient heat as possible to the chimney. So long as you have assured this, controlling the fire should be as simple as stoking the wood charcoals below and placing a new log(s) on when it is time. In the cycle of wood combustion, you will first find that the new log introduced will give off smoke in an open fire. Once there is enough heat supplied to the saturated smoke, it will combust, giving off flame. When you see flames, you are witnessing the smoke leaving the wood reacting with oxygen under heat. Given this, you can identify when it is time to introduce the new log when the flames begin to die down and you are left with a bed of embers and charcoals. When there are little to no flames left on coming from the wood, the wood gasses have been spent, leaving you with the carbon part of the wood left to burn which is the perfect time to introduce a new long and repeat the cycle.
Over to you
Now that you know the basics of lighting and controlling your fire, it is over to you to master the craft. Although it is not a legal requirement in France, we highly recommend you install a CO alarm in the room of your open fire as we do with every flame-based appliance. If the chimney has not been swept prior to your fire, we recommend you contact your local chimney sweep to have the chimney cleaned and inspected before you strike your match. If you live within 1 hours travel of L’isle Jourdain 86150, please get in contact with us, we would be happy to assist you.